Start simple, plan well, and build skills step by step. This guide helps beginners pick a clear direction — sky-with-terrain scenes, moonlit vistas, or city-at-dusk frames — so you avoid feeling overwhelmed.
Success depends on preparation and a steady routine. You will learn manual exposure, focusing tricks, and a short workflow: plan at home, pack gear, switch to manual, set exposure, lock focus, compose, then refine in post.
Expect more planning than daytime work, but also richer atmosphere and stronger stories in your shots. Beginners face low light, long exposures, noise, and focus challenges. This article solves those step-by-step with repeatable settings and test shots that build real confidence.
Gear need not be expensive. Comfort with your current camera, a sturdy tripod, and basic safety habits matter most. Protect your vision, watch weather and terrain, and work methodically to stay safe and get consistent results.
Set Your Goal: What Makes a Great Night Landscape Image
Choose your visual intent first so technical choices serve the story. A clear goal—star field, moonlit scene, or urban glow—guides exposure, composition, and how you balance bright and dark areas.
Sky versus urban looks
Decide whether you want a subtle night sky with faint star color and soft tones, or a lively frame dominated by city lights and strong reflections. Each look needs different priorities: preserve star detail for the sky, or control highlights and glare for the city.
Define a foreground subject
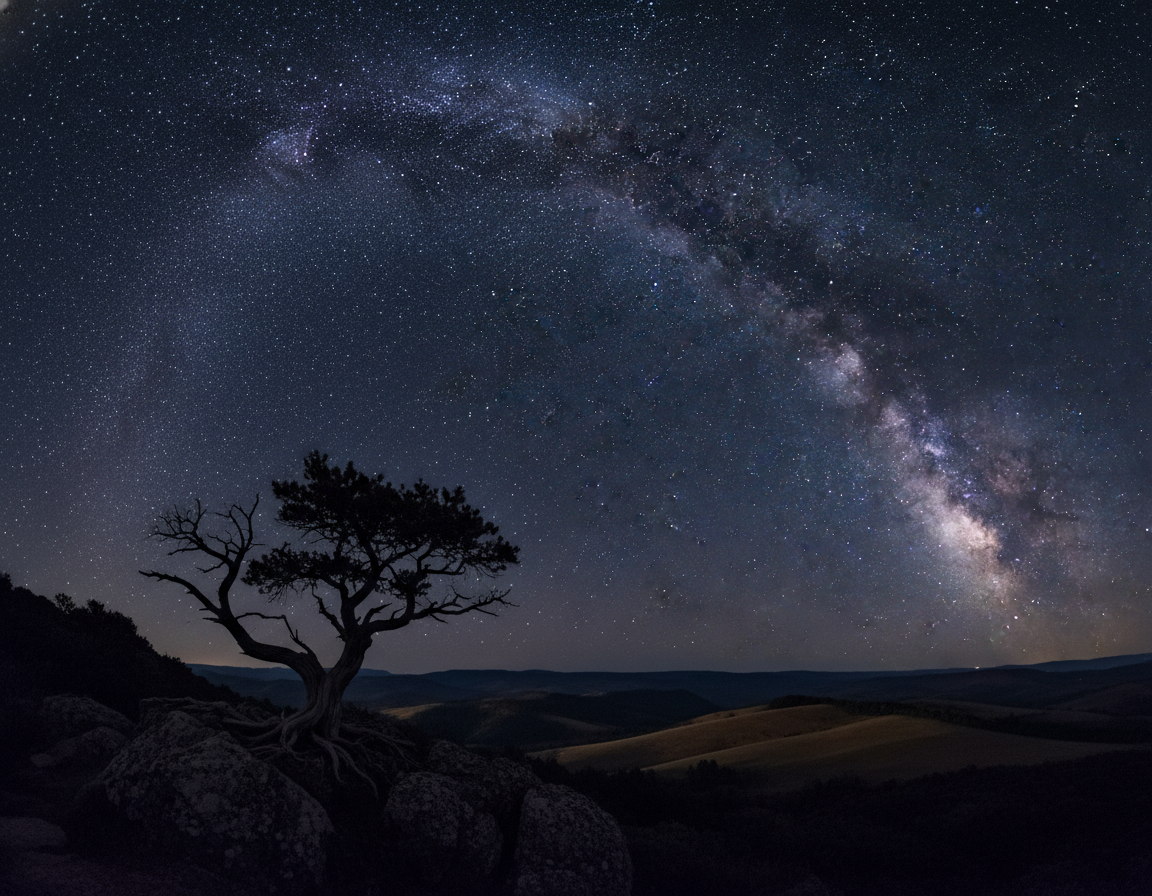
A defined subject prevents empty upper areas. Anchor your frame with a landform, road, building, or framed silhouette. This gives scale and context when the sky covers most of the scene.
- Pick a single goal before you pack—stars, moonlight, or urban glow affect composition and exposure.
- Balance the sky and foreground: if the sky dominates, make the foreground add shape or depth.
- Use simple storytelling prompts: mystery, calm, scale, solitude, or energy—compose to match the feeling.
- On-site checks: sharp stars or deliberate trails, controlled highlights, a clean horizon, and a readable foreground.
| Look | Exposure priority | Key compositional cue |
|---|---|---|
| Dark-sky night sky | Preserve star color and faint detail | Wide sky, low horizon, foreground anchor |
| City lights scene | Control highlights and reflections | Leading lines, bright focal points, framed architecture |
| Moonlit or mixed | Balance moon brightness with foreground exposure | Use moon as a highlight and foreground silhouette for scale |
Plan Your Shoot Like a Pro Before You Leave Home
A clear pre-shoot plan turns a rushed outing into a smooth session. Use a short checklist at home so you arrive focused and ready to work in low light conditions.
Weather, dew, and timing
Check cloud cover, humidity, wind, and temperature. Clouds hide stars and the Milky Way. High humidity risks dew and lens fog. Wind affects tripod stability and sharpness.
Moon, light pollution, and true darkness
Use moon phases to shape contrast: a new moon favors star detail; a brighter moon lights the foreground but can wash out faint stars.
Consult a light pollution map and pick darker zones (green/blue/gray) to preserve star detail. True darkness begins when the sun is about 18° below the horizon—astronomical twilight ends at different times by location and season.
Apps and scouting
Plan with PhotoPills, TPE, or Stellarium to place the Milky Way, moonrise, and constellations relative to your foreground. Scout the site in daylight to note safe paths, leading lines, and best horizon placement.
“Arrive early. Set up, confirm composition, and give yourself buffer time to adapt to changing conditions.”
| Planning factor | Why it matters | Quick action |
|---|---|---|
| Cloud cover | Blocks stars and Milky Way | Reschedule or move |
| Moon phase | Controls scene contrast | Pick new moon for stars |
| Light pollution | Washes sky glow | Use dark-sky maps |
| Timing | True darkness & moon alignment | Arrive before full dark |
Essential Gear for Sharp, Clean Results in the Dark
Sharp, low-noise frames start with gear choices that match the demands of long exposures. Pick tools that give you stable support, reliable manual control, and ways to avoid blur and condensation.
Camera choices: Look for a DSLR or mirrorless body with clean high-ISO output, good dynamic range, and full manual controls. You don’t need a flagship; choose a model that lets you set aperture, ISO, and shutter speed directly.
Lens and aperture
Use a wide-angle lens (35mm or wider) for broad skies and foreground. An f/2.8 optic is ideal. An f/4 lens will work if you accept higher ISO and more noise.
Tripod fundamentals
Stability beats convenience. A sturdy tripod prevents tiny movements that ruin stars during long exposures. In wind, lower the center column and spread the legs low for extra steadiness.
- Remote trigger or intervalometer: Fires the shutter without touching the camera to reduce shake and enable stacking routines.
- Headlamp (red mode): Protects night vision while adjusting composition and settings.
- Extra batteries: Keep spares warm in a pocket; cold drains power fast during long sessions.
- Lens heater band: Prevents dew and frost so your glass stays clear through the shoot.
“A small, well-prepared kit and a stable setup beat rushed choices when light is scarce.”
| Item | Why it matters | Quick tip |
|---|---|---|
| Camera | Controls ISO and shutter for clean exposures | Prefer clean high-ISO performance |
| Lens | Wide + fast = more usable light | f/2.8 ideal; f/4 workable |
| Tripod | Keeps stars sharp during long exposures | Use a sturdy tripod and lower legs in wind |
Switch to Manual Mode for Reliable Night Photography
Switching to full manual control gives you predictable results when light is scarce. Manual mode removes guesswork and helps you learn consistent techniques fast.
Why auto exposure often fails
Auto meters are fooled by mostly dark frames with a few bright points. The camera will try to average the scene and often under- or overexpose key areas.
Why autofocus hunts in low light
Autofocus systems need contrast. With wide apertures and faint subjects, the AF system cannot lock and it hunts, wasting time and battery.
- Aperture: set the lens to your chosen value for depth and light control.
- Shutter speed: choose a time that keeps stars sharp or allows trails.
- ISO: raise sensitivity carefully to balance noise and detail.
- White balance: pick a repeatable value or shoot RAW to tweak later.
- Focus: use Live View on a bright star or distant light for sharp focus.
Set, test, adjust: lock a setting, take a short test shot, then tweak one control at a time. This loop builds confidence and repeatable results.
Master the Exposure Triangle for Night Landscape Photography
Mastering the three exposure controls gives you the power to balance bright stars, usable foregrounds, and low noise. Good results come from making deliberate tradeoffs, not guessing aloud in the field.
Aperture: when to shoot wide open and when to stop down
Set aperture first. For most low-light landscape work, f/2.8–f/4 is the practical sweet spot. Wide-open lets in light and preserves star color.
Stop down when you need sharper foreground detail or to reduce coma on fast wide lenses. Know that each stop you close costs light and forces changes to ISO or shutter.
ISO: raise sensitivity without ruining image quality
Start around ISO 1600 and move up to 6400 only as needed. Increase ISO in small steps and check results. Very high ISO can wash out star color and reduce dynamic range.
Tip: prefer a cleaner image with a slightly longer exposure rather than maxing ISO first.
Shutter speed: control brightness while keeping stars sharp
Shutter time brightens the scene but invites star motion. Use rules like 500 or, better, NPF calculators for precise limits based on focal length and sensor.
Decide if you want sharp stars or trails, then set shutter accordingly and raise ISO to taste.
- Pick aperture (f/2.8–f/4).
- Set a safe shutter speed for stars.
- Raise ISO to reach usable brightness with acceptable noise.
Best Beginner Camera Settings for Night Scenes
Pick a simple, repeatable starting recipe. Use it to take quick test shots, then refine based on the scene. This keeps decisions fast and consistent so you learn what each change does.
Recommended starting point
Starter settings: Aperture f/2.8–f/4, shutter 10–30 seconds, ISO 1600–6400, Daylight white balance, shoot RAW.
Aperture and ISO guidance
Use f/2.8 when you need more light and star color. Stop to f/4 for sharper foreground detail. Start ISO at 1600 and raise in small steps. Higher ISO brightens the image but increases noise.
Shutter speed targets
Choose 10–30 seconds based on focal length and whether you want sharp stars or slight motion. Shorter times keep a crisp shot; longer times add trails.
White balance and RAW
Daylight white balance is a dependable baseline. It avoids auto shifts and keeps tones natural for editing. Shoot RAW to recover shadows, protect highlights, and change WB later.
“Take a quick test shot, check the histogram, zoom to confirm stars are sharp, then adjust one control at a time.”
| Setting | Starter value | When to change |
|---|---|---|
| Aperture | f/2.8–f/4 | Stop down for sharper foreground |
| Shutter | 10–30 s | Shorten for sharp stars; lengthen for trails |
| ISO | 1600–6400 | Increase if frame is too dark after aperture/shutter |
| White balance | Daylight | Change in RAW if creative color needed |
Shutter Speed Rules for Stars: 500 Rule vs. NPF Rule
Choosing the right shutter time is the single best move to keep stars as points instead of smears. Two rules help you decide: the simple 500 rule and the more precise NPF calculation.
How to use the 500 rule with full-frame and crop sensors
The 500 rule: divide 500 by your focal length (full-frame). For example, 500 / 20mm ≈ 25 seconds. For crop sensors, multiply the lens focal length by the crop factor first. A 20mm on a 1.5× crop behaves like 30mm, so 500 / 30 ≈ 16 seconds.
Why the 500 rule can fail on modern high-megapixel cameras
Higher-resolution sensors show tiny elongation sooner. Prints and crops reveal trailing that the 500 rule might miss. If you plan tight crops or large prints, expect shorter safe exposures.
Using NPF calculations (and apps) for more precise results
The NPF rule factors focal length, aperture, and sensor. Use PhotoPills or a shutter-speed-calculator app to get exact limits and avoid manual math. These tools are standard for careful sky photography.
When to embrace star trails instead of fighting motion
Zoom in on image edges to judge acceptable trailing. If you can’t keep points, consider intentional star trails. Long single exposures or stacking many shorter frames both create strong star trails and a deliberate creative look.
Once shutter speed is chosen, finalize ISO and focus with confidence.
Get Sharp Focus at Night Every Time
Getting precise focus in very low light starts with a repeatable method and a quick verification step. Use a simple Live View routine so you can trust each long exposure.
Live View manual focus on a bright star or distant light
Magnify the Live View display, pick a bright star or distant lamp, and turn the focus ring until that point becomes the smallest, crispest dot on screen. Lock the ring or switch to manual focus to prevent accidental shifts.
Why infinity marks can be inaccurate
Lens infinity marks are rough guides. Manufacturing tolerances and focus‑by‑wire systems can place true infinity past the printed mark.
How temperature and humidity can shift true infinity
Metal and glass expand or contract with temperature changes. Rising humidity can also alter the optical distance enough to soften wide‑aperture stars.
Quick focus checklist before every long exposure
- Set manual focus: lock after Live View magnified adjustment.
- Re-check after moving the tripod: bumps can nudge the lens.
- Re-check after major temperature shifts: allow time to settle.
- Take a short test frame: zoom the image to confirm points are pin sharp.
“Verify focus with a test shot before committing to a sequence; it saves time and keeps results consistent.”
Compose Night Landscapes That Don’t Feel Empty
Strong composition turns an empty sky into a purposeful scene that guides the viewer across the frame. At low light, tones are limited, so your layout must do more work.
Rule of thirds and horizon placement
Decide where the story lives. Place the horizon low if the sky is the subject. Raise it if the city or terrain should dominate.
Use the rule of thirds to keep the frame balanced and intentional.
Leading lines that pull the eye
Roads, rivers, and strings of lights become powerful eye paths after dark. Compose so these lines lead toward your main subject.
Foreground matters: get low and build depth
A strong foreground is not optional. Rocks, textures, or silhouettes add scale and stop the frame from feeling like “just sky.”
Get low and place a near object close to the camera to create layers from front to back.
Framing and balancing bright elements
Use trees, arches, or buildings to frame the subject and to add contrast. Place bright sources — moon, signs, or lit windows — where they balance the composition and do not clip highlights.
“Anchor the frame with a clear foreground and guide the eye with deliberate lines; small choices make a big visual difference.”
| Composition tool | Why it matters | Quick tip |
|---|---|---|
| Rule of thirds | Keeps horizon and subjects balanced | Lower horizon for sky emphasis; raise for terrain focus |
| Leading lines | Directs viewer to the focal point | Use roads or light strings to pull the eye inward |
| Foreground | Provides scale and depth | Get low and include textures or silhouettes near the camera |
| Framing & balance | Controls attention and exposure impact | Place bright elements deliberately to avoid clipping |
Night Landscape Photography in the Field: A Simple Workflow
Start each session with a fast, high‑ISO test to lock composition and exposure before you commit to long frames. This quick check saves time, battery, and frustration while you refine framing and focus.
Use short high‑ISO test shots to dial composition and exposure
Take a few 2–5 second frames at high ISO. They reveal sky placement and the foreground relationship without waiting for 20–30 second exposures.
Adjust framing, focus, and histogram, then move to final settings once the test looks right.
Turn off image stabilization when mounted on a tripod
Disable lens or body stabilization whenever the camera is fixed. Stabilizers can introduce micro‑blur during long exposures.
Use a remote trigger or self‑timer to prevent vibration
Use a cable or wireless remote, intervalometer, or the 2‑second self‑timer to fire the shutter. This removes shake from finger pressure.
- Set up tripod and compose roughly.
- Take fast test shots at high ISO; refine composition and focus.
- Turn off image stabilization.
- Switch to final aperture/shutter/ISO and trigger with remote or timer.
- Shoot multiple frames for safety and stacking.
Repeatability is key: experienced photographers follow the same routine every outing to build consistent results.
Troubleshooting loop: if frames are blurred, check focus and stabilization; if noisy, lengthen exposure or stack; if highlights clip, lower ISO or shorten shutter.
“Test fast, fix once, then shoot many frames — it multiplies your chances of a keeper.”

Create Star Trails with Long Exposures and Stacking
Star trails are a visible record of Earth’s rotation, so time is your main creative tool.
Decide your method first: a single very long exposure or many shorter frames you will stack. A single long exposure is simple but increases sensor heat, noise, and the chance that one error ruins the shot.
Stacking many shorter frames is safer. It limits sensor noise, eases battery drain, and lets you discard a single bad frame if a car or light sweep appears.
Settings starting points: aperture, ISO, and total time
Start wide but not maximum: use a fast wide-angle aperture for more light and fewer optical issues. Try moderate ISO to keep noise under control. Total capture time controls arc length—tens of minutes for short arcs, hours for dramatic circles.
- Starter idea: f/2.8–f/4, ISO 800–1600, total capture 30–90 minutes (stacked 30–60s frames).
- For one continuous frame, reduce ISO and be prepared for increased noise and sensor heat.
- Use an intervalometer and mirror lock (if applicable) to automate capture and reduce vibration.
Compose and reduce light pollution
Pick a dark site with minimal light pollution so trails stay crisp. Anchor the frame with a strong foreground silhouette or texture; place Polaris for circular patterns in the Northern Hemisphere or aim for sweeping arcs elsewhere.
“Stacking short frames gives control: less heat, simpler recovery, and cleaner final results.”
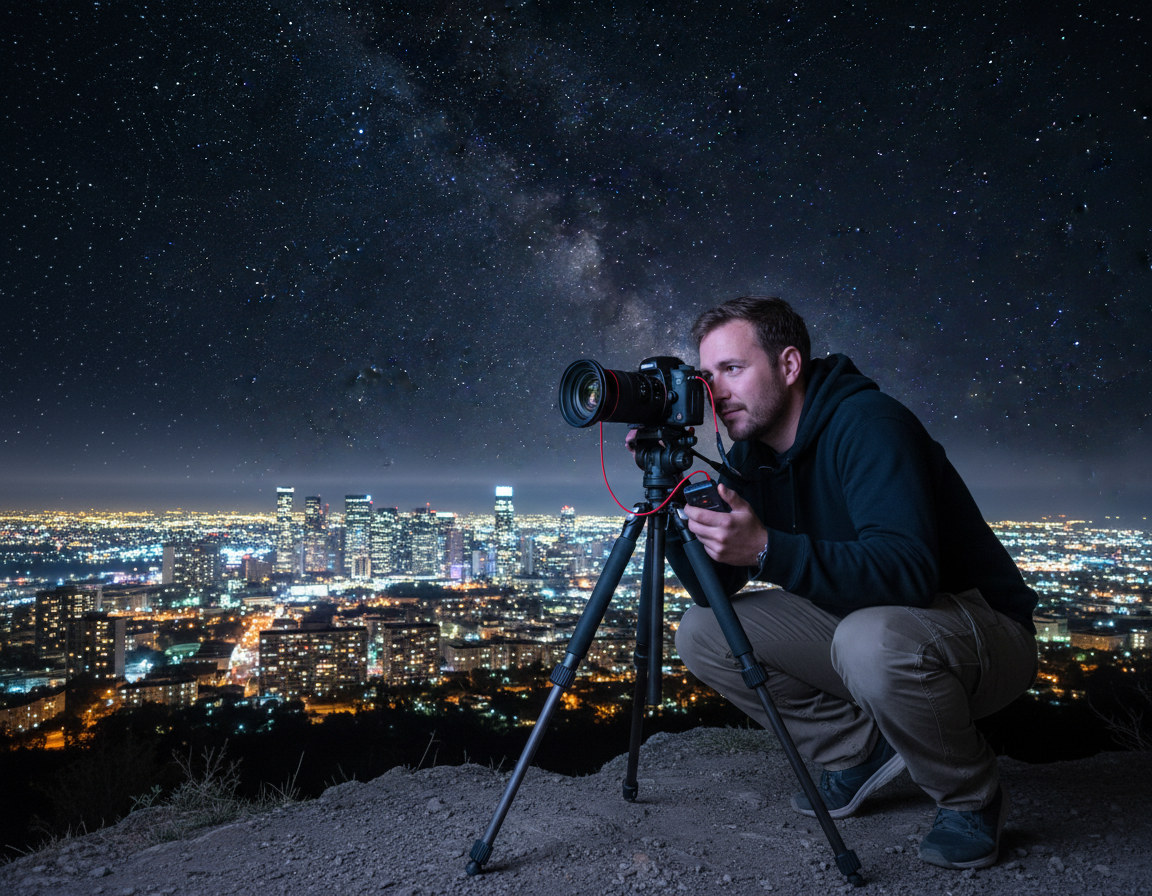
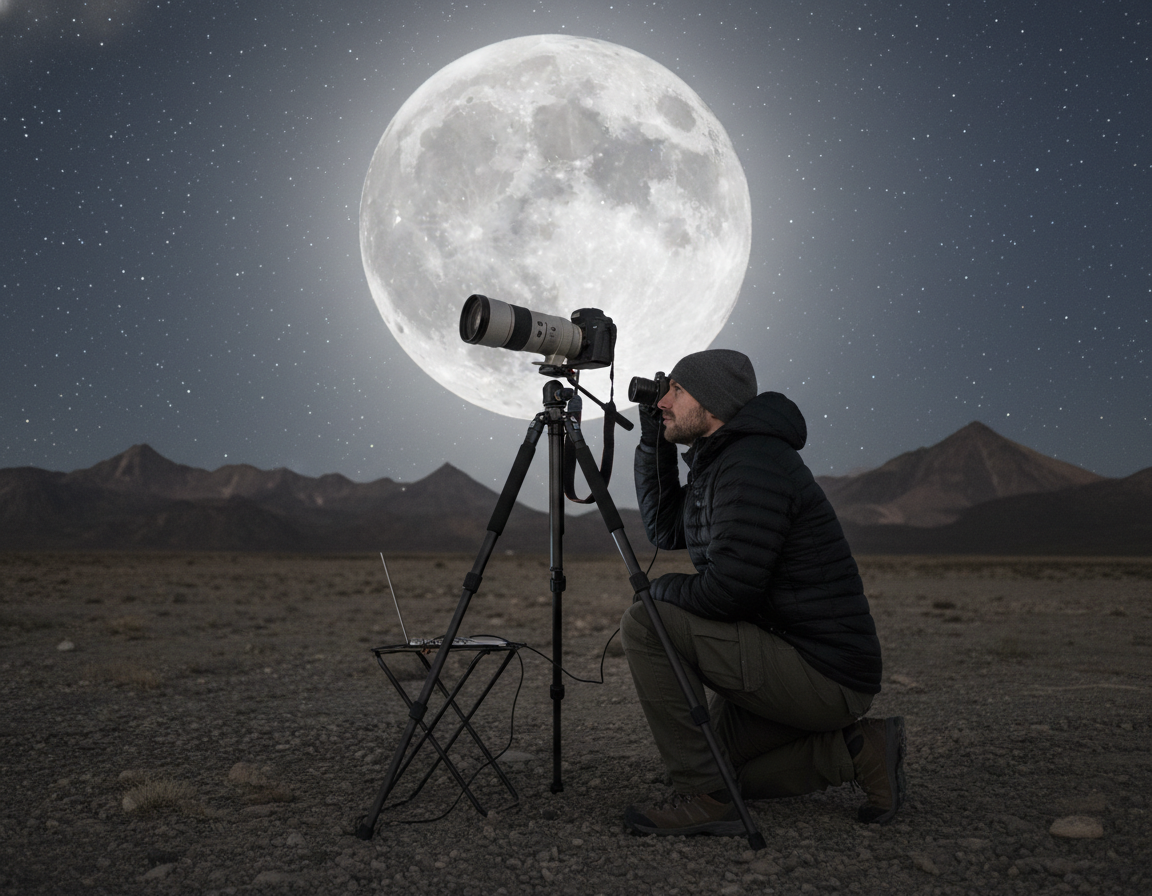
Photograph the Moon and City Lights Without Blowing Highlights
When the moon or bright street sources dominate, your priority shifts from gathering light to protecting highlights.
Moon scenes behave like small suns. They are much brighter than stars, so exposure aims to preserve detail on the lunar surface, not to push shadow detail first.
Moon phases and timing
Plan around moonrise or moonset when the contrast is lower. A low moon reduces extreme dynamic range and makes it easier to hold detail in both sky and foreground.
Use the Looney 11 rule
Start at f/11 with a shutter speed ≈ 1/ISO (for ISO 100, try 1/100s). Check the histogram and highlight warnings and tweak until the lunar highlights are safe.
Telephoto versus wide-angle approaches
Telephoto (200mm+) isolates lunar detail and gives dramatic scale. Wide-angle keeps context, showing the moon with foreground and atmosphere for a more storytelling frame.
Handling urban highlights and reflections
Meter to protect bright signs and lamps. Watch for clipped highlights and distracting glare. Reflections on wet streets or water can add strong leading lines if you expose to keep them controlled.
“Protect highlights first; then refine shadow detail with exposure blending or selective editing.”
Try Advanced Night Techniques: Vertoramas and Sharper Foregrounds
Vertoramas and focus stacking let you capture tall scenes that keep both the sky and a close foreground crisp. These methods work together when a single frame cannot hold scale and detail.
How to shoot a vertorama safely: mount the camera on a tripod, set manual exposure and manual focus, and keep framing consistent. Shoot horizontal frames with about 30–50% overlap so software can stitch them reliably.
Shooting order and capture tips
Work bottom to top. Start with near-foreground frames, then move upward in even steps. This order reduces missed coverage and makes file sorting easier later.
Stitching workflow in Lightroom or Photoshop
Import files, select the series, and use Panorama or Photomerge tools. Let the program align and blend, then crop and correct edges for a clean final frame.
Focus stacking for front-to-back sharpness
Shoot at least two sets: one focused at infinity for distant points, another focused on the closest foreground. Combine them in layers and mask the sharp areas to blend front and back.
- Consistency: keep exposure and white balance the same across all frames to avoid seams and color shifts.
- File order: label or number files to match capture order for faster stitching and stacking.
“Consistent settings and planned coverage are the best insurance against seams and uneven blends.”
For a deeper workflow guide, see the art of night photography for related tips on capture and post-processing.
Post-Processing Night Photos for Natural, Detailed Results
A natural-first workflow preserves atmosphere while letting star color and midtones breathe. Start edits with subtle global moves and protect the histogram’s midtone band.
Noise control basics without smearing stars
Reduce luminance noise sparingly. Use small amounts and check at 100% so point-like stars remain points.
Prefer stacking or longer exposures over aggressive denoise. Balance sharpening and noise reduction to avoid halos around stars.
Avoid overdoing clarity and dehaze
Clarity and dehaze can crush blacks and remove midtones. Apply them in small steps and toggle before/after often.
Recover star color and protect highlights
Pull highlights down rather than pushing exposure up. Use selective masks to protect bright stars so color stays visible and not pure white.
Final checks: horizon, color cast, and edge artifacts
- Level the horizon and correct odd color casts for natural sky tones.
- Inspect corners for coma, soft edges, or stitching seams if you used panoramas.
- Save a preset or short notes to repeat the same gentle workflow across a series.
| Edit | When to use | Common pitfall |
|---|---|---|
| Noise reduction | High ISO frames or single-shot captures | Smearing stars and losing fine detail |
| Clarity/Dehaze | Hazy skies or to add contrast | Crushed midtones and crunchy skies |
| Highlight protection | Moon, lamps, or bright stars | Blown highlights that lose color |
“Preserve the scene’s quiet tone first; reveal detail second.”
Conclusion
Treat each session as a short experiment. Set a clear goal, plan for true darkness and location, pack essentials, switch to manual, pick a star‑safe shutter speed, lock focus, compose with intent, then edit with restraint.
Repeatable habits matter most. Use quick test shots, zoom‑check stars, and keep notes on settings that worked. These routines speed progress even though conditions change.
Explore varied subjects—constellations, moon scenes, city frames, and star trails—to broaden skill and creative choices, even though each look needs different exposure priorities.
Try one simple assignment: revisit the same spot across moon phases to learn how natural light shifts results. With fundamentals under control you can make professional results, even though the environment is dark and unpredictable.
For a practical tutorial on test shots and exposure planning, see this detailed guide.