Night photography exposure is simply how much light your camera records when shooting after dark.
In low light the rules change: your camera builds brightness over time. Long shutter times and higher ISO let the sensor see details your eyes miss.
The guide teaches a repeatable process: plan, set up stable support, dial the exposure triangle—aperture, shutter speed, ISO—focus precisely, then test and refine with test frames and the histogram.
You will learn to pick shutter speed, aperture, and ISO intentionally so highlights in bright lights stay intact and shadows avoid noisy loss.
Later sections cover common subjects such as stars, the Milky Way, star trails, the moon, city scenes, and light trails so you can jump to the topics that match your goals.
This section focuses on modern digital workflows while keeping field-proven long-exposure principles that work across gear and time.
What changes about exposure at night
When ambient light drops, the sensor begins to add up photons over seconds, revealing details our eyes miss.
How your camera “sees” light differently than your eyes
The sensor records brightness continuously during a single shot. That accumulation makes faint tones visible and can transform the mood of a scene.
Long exposure can smooth water and stretch moving lights into trails. It can also make bright headlights blast a frame if left too long.
Common low light challenges: noise, blur, and clipped highlights
Raising ISO brightens shadow areas but adds noise. That tradeoff affects final image clarity and color.
Blur comes from subject movement, wind shake, or star drift as Earth rotates. Fast shutter settings freeze motion; long shutter times show it.
Small, bright sources plus large dark areas create extreme contrast. That raises the risk of clipped highlights if you push overall exposure too far.
When longer time helps and when it hurts your shot
Use more time to reveal faint detail, smooth water, or create light trails. Avoid long frames when bright lights will blow out or moving people will ghost.
Choose exposure duration based on intent: freeze action or show motion, protect highlights or lift shadows.
Pro tip: run short test frames first to confirm results before committing to multi-minute shots.
| Use | Benefit | Risk | When to use |
|---|---|---|---|
| Short shutter | Freeze motion, low noise | Less shadow detail | Fast subjects, protect highlights |
| Long shutter | Smooth water, light trails | Blown lights, star smear | Static scenes, creative motion |
| Higher ISO | Brighter image | Increased noise | Shorter time with low light |
Plan your shoot for better exposure results
A successful shoot starts long before you press the shutter. Good planning reduces surprises and gives you control over how the sky and foreground look in your frame.
Weather and visibility
Checklist:
- Cloud cover — clear, broken, or overcast?
- Humidity and fog risk — will distant lights fade?
- Wind — tripod stability and blur risk.
- Visibility for city lights and distant detail.
Moon timing and phase
The moon changes contrast. A full moon brightens landscapes but can wash out stars. A crescent or half moon often balances foreground detail and sky texture.
Light pollution and scouting
Light pollution is city glow that reduces star visibility. It forces higher ISO or longer shutter times and raises noise risk.
Scout locations in daylight to check footing, framing, and safety before shooting after dark.
Apps and timing
Use PhotoPills, The Photographer’s Ephemeris (TPE), or Stellarium to predict moon times, Milky Way position, and alignment opportunities.
“Arrive about an hour before sunset to test composition and settings, and expect best balance from ~15 minutes before sunset to ~1 hour after.”
Night photography exposure basics: the exposure triangle in manual mode
Switching to manual mode lets you choose exactly how your camera records light, one setting at a time.
Shutter speed — exposure time in seconds
Shutter controls how long the sensor gathers light. It is measured in seconds (or minutes for very long frames).
A 1–2 stop change in shutter speed greatly alters brightness. For star work use the 500 Rule: 500 ÷ focal length gives a starting seconds value before star blur.
Aperture choices: fast glass vs depth of field
Aperture sets how much light your lens admits and affects depth of field. Fast glass (wide apertures) gathers more light at the cost of shallower focus.
For many stellar scenes try f/2.8–f/4 to balance sharpness and light gathering.
ISO tradeoffs: brightness vs image noise
ISO amplifies the signal. Higher ISO brightens previews but increases noise. Modern cameras handle higher ISO better, so use testing to find the sweet spot (commonly 1600–6400).
Histogram and test frames to dial in exposure
Take quick test shots, check the histogram, and adjust one setting at a time.
“Use short test frames first to protect highlights and avoid crushed shadows.”
The LCD can mislead; trust the histogram and protect bright lights in scenes with street lamps or signage.
Set up your camera for sharp long exposures
Preventable camera shake is the most common reason long frames fail. Start by anchoring your rig and planning power and trigger options before the light gets low.
Tripod stability and wind
Stabilization checklist:
- Firm tripod legs and a locked head.
- Keep the center column low or removed to increase rigidity.
- Shelter the rig from direct wind or add weight to the tripod hook.
Strong gusts can cause micro-vibration or topple a setup; choose a protected spot when possible.
Turn off image stabilization
When the camera is on a tripod, turn stabilization off. IS systems can introduce micro-jitter during multi-second frames and hurt sharpness.
Trigger options: release choices
Use a cable release or wireless remote for best results. A 2-second self-timer is a simple fallback when a remote isn’t available.
Compare: cable release = reliable, wireless remote = flexible, self-timer = built-in and quick.
Power and Bulb mode
Cold drains batteries fast; carry spares in an inner pocket to keep them warm. Long sessions and many test frames use lots of power.
Bulb mode is required for multi-minute captures—verify your shutter is actually in Bulb before committing to long frames. If you prefer, shutter-priority or aperture-priority can help during learning, but manual mode gives the most control.
Set up fully while there’s still light, then refine settings and focus as conditions change.
For more workflow tips, see Elevate your photography.
Focus and clarity in the dark
Getting crisp points of light takes more than luck; it needs a repeatable focusing routine. Autofocus often fails in low light, and small focus errors are one of the biggest causes of soft images. The rear LCD can hide tiny blur, so adopt a clear method before you judge exposure or noise.
Manual focus on a bright point
Step-by-step:
- Switch to Live View and 10x magnification.
- Aim at a bright star or distant lamp and adjust focus until the point is smallest and most defined.
- Lock the focus ring or switch to manual focus mode to prevent bumps while shooting.
Infinity pitfalls and fine-tuning
The infinity (∞) mark is a starting way, not a guarantee. Many lenses focus slightly past true infinity and produce soft stars if you stop there.
Take a short test image, zoom to 100% on the rear screen, then nudge the focus and repeat until points are sharp.
Keeping detail across wide frames
Wide-angle lenses can show coma or edge softness. Stopping down one stop often improves corner detail without costing too much light.
Recheck focus after changing lenses, temperature shifts, or long moves. Sharp focus is essential before evaluating the rest of your night photography workflow.
| Task | What to do | Why it matters |
|---|---|---|
| Initial focus | Live View → 10x → center on bright point | Find the smallest, sharpest point |
| Fine-tune | Test shot → 100% zoom → adjust | Confirms true sharpness across the frame |
| Stability | Lock ring & avoid touching lens | Prevents accidental shift during shooting |
“Sharp focus is the foundation — get it right first, then refine exposure and composition.”
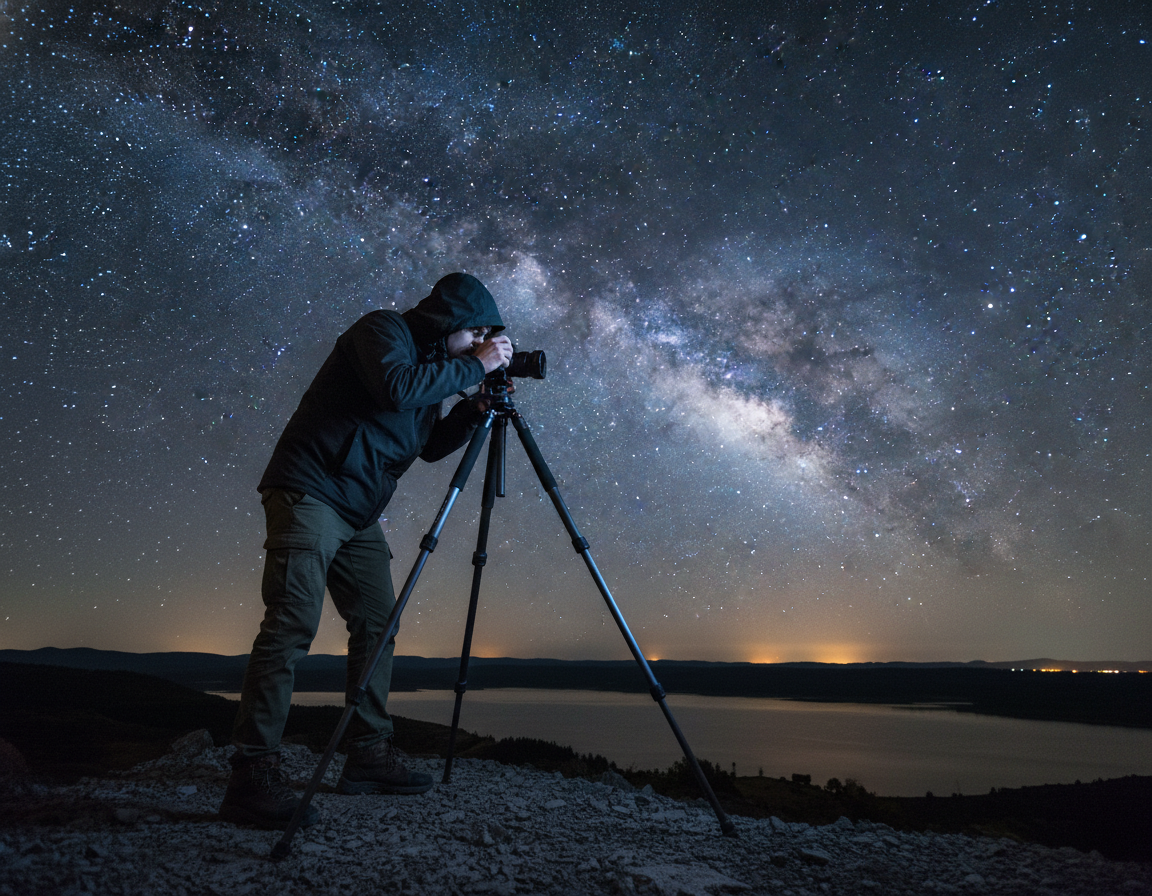
Exposure settings for star photography and the Milky Way
Begin with a simple template of settings; tweak from there based on what your camera shows.
Starter templates that work
Aperture: f/2.8–f/4 to gather light while keeping many lenses sharp. Stop down one stop if corners are soft.
ISO: 1600–6400 as a starting range; in very dark skies you may try higher. Balance noise versus brightness.
Shutter speed: Use the 500 Rule as a first guess, then refine (examples below).
Applying the 500 Rule
The 500 Rule estimates max seconds: 500 ÷ focal length (full-frame). For a 20mm lens that gives ~25 seconds as a starting point.
Examples: 14mm ≈ 35s, 35mm ≈ 14s. Treat these as guides—high-resolution sensors and longer lenses need shorter times.
Adjusting for real-world results
Take a test frame, zoom to check stars, and read the histogram. If stars smear, shorten the shutter speed.
If the frame is too dark, open the aperture or raise ISO. If highlights clip, reduce seconds or lower ISO.
| Goal | Aperture | Shutter (s) | ISO |
|---|---|---|---|
| Milky Way wide field | f/2.8 | 15–25 | 1600–3200 |
| Sharper corners | f/3.5–f/4 | 10–20 | 3200–6400 |
| Long focal length | as wide as lens allows | 5–12 | 1600–6400 |
“Always run a short test, verify sharpness, and then iterate — conditions change even at the same location.”
Star trails exposure techniques that minimize noise
Deciding between one continuous shot and many linked frames shapes both noise and risk in your result.
What star trails are: long arcs recorded as the Earth rotates. You can capture them with a single long exposure or by stacking many shorter frames. Each method has clear tradeoffs.
Single long exposure vs stacking multiple shorter exposures
Single long exposure is simple: set a very long shutter time and let the sensor run. It can yield smooth, continuous trails but risks sensor heat, high noise, and losing the entire image if something fails.
Stacking uses many shorter images combined in software. This reduces noise and battery drain and lets you drop ruined frames (airplanes or clouds) without losing the whole scene.
Suggested settings by approach
Single long: aim for low ISO when possible (example: ISO 100, 3600 sec, f/3.2 at 14mm). Wide angle plus long time gives long arcs with less star trailing per pixel.
Stacked sequence: use shorter shutter speed (20–60s), aperture f/2.8–f/4, and ISO 800–3200 to keep stars bright while limiting noise in each frame.
| Method | Shutter | Aperture | ISO |
|---|---|---|---|
| Single continuous | Minutes to hours (e.g., 3600 s) | f/3.2–f/4 | ISO 50–400 |
| Stacking many frames | 20–60 s per frame | f/2.8–f/4 | ISO 800–3200 |
| Hybrid (foreground blend) | Short frames + long background | f/2.8–f/5.6 | ISO 100–1600 |
Stability, gear, and scene details
Stability matters: use a sturdy tripod, turn image stabilization off, and trigger with a remote or intervalometer. Avoid touching the camera during sequences.
Wind, intermittent clouds, or nearby lights often make stacking the safer option. Stacking handles changing conditions and lets you preserve fine detail in the final scene.
Foreground considerations for depth and context
Include a solid foreground element—trees, ridgelines, or buildings—to anchor the composition. Lock focus on the foreground or blend short foreground frames with the star stack.
“When conditions are unstable, capture many short frames; it gives you options and keeps noise under control.”
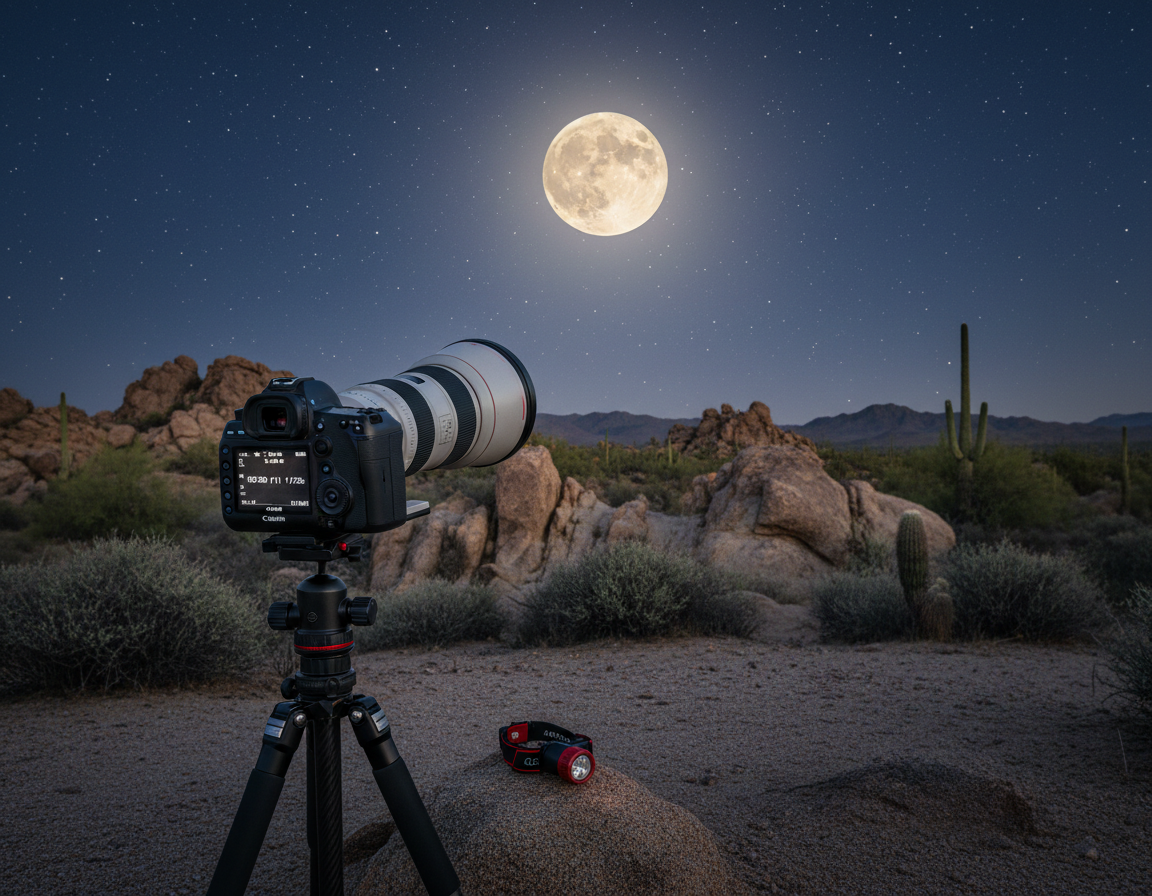
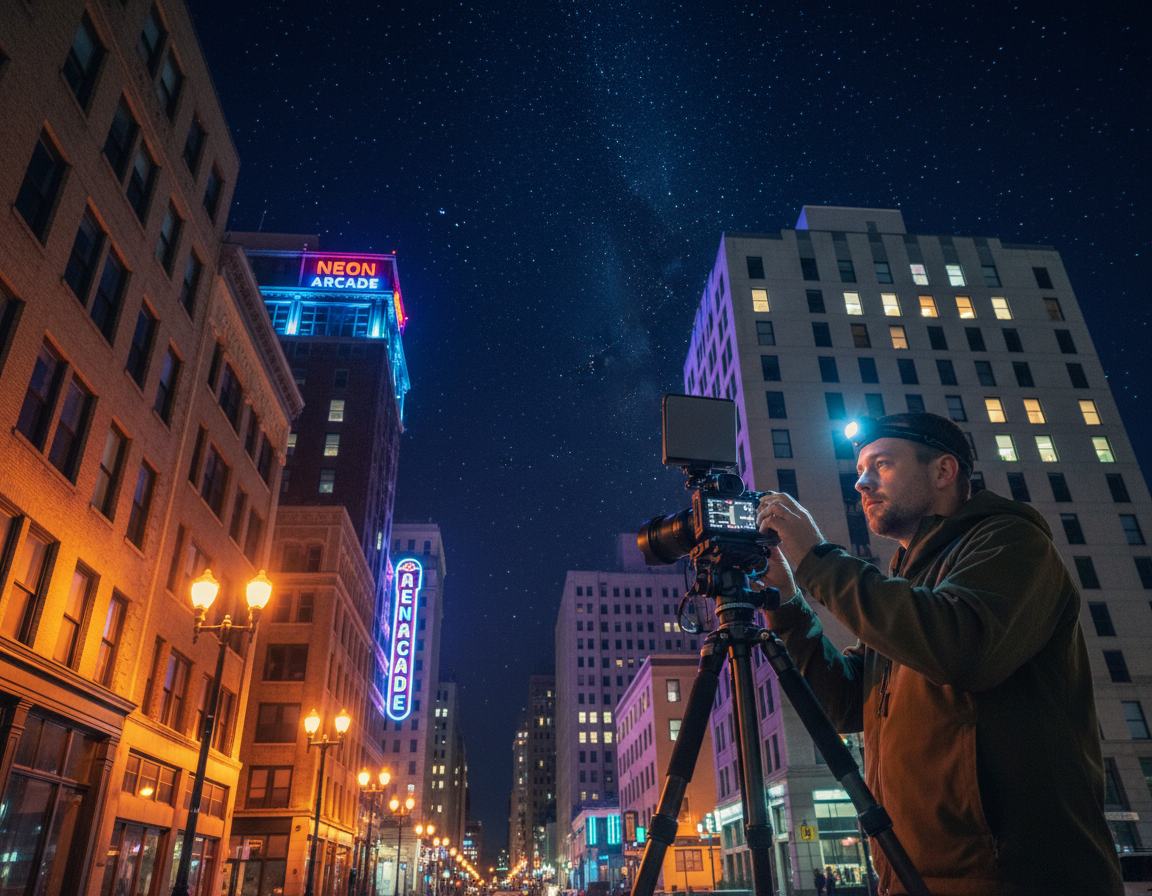
Moon and city night scenes: balancing bright lights and dark skies
A bright moon behaves like a daytime sun in the frame, forcing deliberate choices to hold both lunar texture and darker surroundings.
Looney 11 rule as a baseline
The Looney 11 rule gives a quick starting point: set aperture to f/11 and use a shutter of 1/ISO. For example, ISO 100 → 1/100s for a well-lit moon.
Adjust when haze, thin clouds, or the moon near the horizon reduce contrast. In those cases open the aperture or slow the shutter slightly to keep lunar detail.
Telephoto lens tips for lunar detail
Use a 200mm+ lens to fill the frame and capture crater texture. Mount the rig on a tripod and use a fast shutter to freeze surface contrast.
Stop vibration with a cable release or 2-second self-timer. When using long focal lengths, check sharpness at high magnification and tighten support.
Dual exposure workflow for moon + landscape
Shoot one frame for the moon (preserve texture) and a separate frame for the foreground or city scene. Use lower ISO and faster shutter for the moon, then a longer shot with wider aperture for the landscape.
Blend the two frames in post to keep natural-looking results and avoid blown highlights on the lunar disk.
Light trails for traffic and safe positions
For car or train light trails start around 10–15 seconds. Keep ISO low (often ISO 100) and adjust aperture to control overall brightness.
Prioritize safety: shoot from sidewalks, bridges, or designated overlooks. Never stand in active lanes or on tracks while waiting for a passing vehicle.
To prevent blown headlights during Bulb shots, stop down, lower ISO, shorten time, or briefly block the lens with a black card during the brightest passes.
| Goal | Shutter | Aperture | ISO |
|---|---|---|---|
| Moon detail | 1/100s (ISO100) | f/11 | 100 |
| Landscape + city | 1–8s | f/2.8–f/5.6 | 100–800 |
| Light trails | 10–30s | f/8–f/16 | 100 |
“Treat the moon as a bright, daytime subject against a dark scene and use dual captures when you need both lunar and foreground detail.”
Composition that supports the exposure and tells a story
Strong composition tells the camera where to look and makes exposure choices clearer. It defines the subject and shows which parts of the scene can hold shadow or preserve highlight detail.

Rule of thirds and horizon placement for skies
Place the horizon lower when the sky is the star of the frame. Move it higher when foreground elements carry the story.
Tip: a balanced horizon simplifies settings by clarifying which region needs protection from clipping.
Leading lines with roads, bridges, and city paths
Use roads, bridges, or lit walkways to guide the eye into the scene. Long shutter times often turn these into flowing lines that connect foreground and sky.
Framing with silhouettes and natural shapes
Silhouettes read well in low light. Place a strong shape against a brighter sky to create a readable subject without heavy brightening.
Vertoramas at night and capture technique
Vertoramas stitch multiple horizontal images upward to keep both sky scale and foreground detail. Shoot in manual mode with fixed settings and manual focus.
- Level the tripod and lock the head.
- Shoot bottom-to-top with 30–50% overlap.
- Keep identical settings for each frame.
Stitch in Lightroom (Stitch Panorama) or Photoshop (Photomerge), then crop and fine-tune global tones for a natural blend.
“Decide what feeling the image should convey—quiet, mystery, or energy—and compose the scene to support that idea.”
Conclusion
Finish each session by validating your settings and recording the adjustments that mattered.
Summarize the workflow: plan conditions, stabilize the camera, choose manual mode and the exposure triangle, focus carefully, then refine with test frames and the histogram.
If a shot blurs, shorten the shutter or firm up the support. If images look noisy, lower ISO or add more time. If highlights clip, reduce overall exposure and protect bright lights first.
Quick checklist: tripod stable, stabilization off, remote or self-timer ready, extra battery packed, focus checked at 100%, Bulb mode confirmed when needed.
Practice deliberately—visit the same spot under different moon phases and weather to build a sense for settings. Shoot safely, review your frames after each session, and use what you learn to make the next outing more rewarding.